Step 1
Step 1: Basic Resource
We'll be working with a single database table, employees:
| id | first_name | last_name | age | created_at | updated_at |
|---|---|---|---|---|---|
| 1 | Homer | Simpson | 39 | 2018-09-04 | 2018-09-04 |
| 2 | Waylon | Smithers | 65 | 2018-09-04 | 2018-09-04 |
| 3 | Monty | Burns | 123 | 2018-09-04 | 2018-09-04 |
The Rails Stuff 🚂
Use the built-in generator to create the database table
and corresponding ActiveRecord model:
$ bin/rails g model Employee first_name:string last_name:string age:integer
$ bin/rails db:migrate
Now let's seed some random development data, using Faker (which was installed in Step 0):
# db/seeds.rb
Employee.delete_all # Ensure the DB is cleaned each run

100.times do
  Employee.create! first_name: Faker::Name.first_name,
    last_name: Faker::Name.last_name,
    age: rand(20..80)
end
Run this seed file with
$ bin/rails db:seed
The Graphiti Stuff 🎨
Just like Rails, Graphiti has built-in generators. Let's generate
the corresponding Resource for our Employee model:
$ bin/rails g graphiti:resource Employee first_name:string last_name:string age:integer created_at:datetime updated_at:datetime
This generated a few things, but for now let's focus on
EmployeeResource:
class EmployeeResource < ApplicationResource
  attribute :first_name, :string
  attribute :last_name, :string
  attribute :age, :integer
  attribute :created_at, :datetime, writable: false
  attribute :updated_at, :datetime, writable: false
end
This code defined the RESTful Resource we want our API to expose. Let's run our server and see what it does:
$ bin/rails s
Visit localhost:3000/api/v1/employees. You should see a JSONAPI Response:
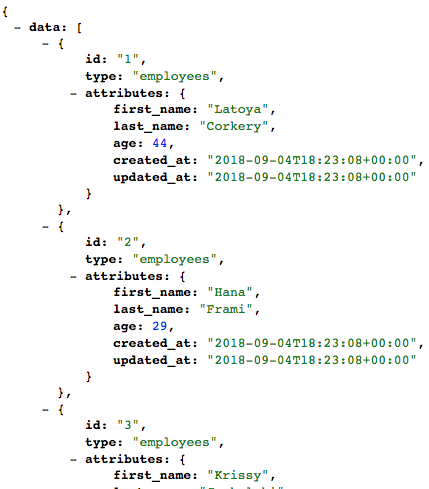
If you find the payload a little intimidating, add .json to the URL for a more traditional response, or .xml for XML. Both are different renderings of the same EmployeeResource.
Resources are comprised of Attributes:
# app/resources/employee_resource.rb
attribute :first_name, :string
Each attribute defines behavior for:
- Reading (display)
- Writing
- Sorting
- Filtering
- Fieldsets
Let's start with simple display, turning first_name into all capital
letters:
# app/resources/employee_resource.rb
attribute :first_name, :string do
  # @object is your model instance
  @object.first_name.upcase
end
This is the most important thing to understand about Resources: they are just a collection of defaults, all of which can be overridden. attribute :first_name is shorthand for attribute :first_name do @object.first_name end.
We'll go into further Resource customizations over the course of this tutorial. For now, undo the capitalization change above, and verify our out-of-the-box defaults: the same filter, sort, and pagination capabilities you exercised in the Quickstart work here too, just against employees instead of posts. See the Overview guide for the full capability reference.
Write operations are easiest to verify with integration tests, which were created when we generated our Resource: an API Spec covering the request/response cycle, and a Resource Spec covering the Resource's logic directly. See the Testing Guide for what these look like and how they differ. The example there uses the same create payload shape the generator produced for EmployeeResource.
Before we run these specs, we need to edit our factories to ensure dynamic, randomized data. Let's change this:
# spec/factories/employee.rb

FactoryBot.define do
  factory :employee do
    first_name { "MyString" }
    last_name { "MyString" }
    age { 1 }
  end
end
To
# spec/factories/employee.rb

FactoryBot.define do
  factory :employee do
    first_name { Faker::Name.first_name }
    last_name { Faker::Name.last_name }
    age { rand(20..80) }
  end
end
Now run the generated specs:
$ bundle exec rspec
You'll see 11 tests pass, with 3 pending. One of the pending specs was
autogenerated by rails - you can delete spec/models/employee_spec.rb
for now.
That leaves us with two "update" specs. These are marked pending so you can manage the data yourself. Follow the comments in these specs to add attributes and get them passing.